DNS Name Failover for Highly Available AWS Services
DNS Name Failover for Highly Available AWS ServicesHighly available AWS services are supposed to be build covering multiple Availability Zones (AZ). Highly available AWS services with single point of failures (example: traditional, non parallel database) need to implement their single point of failure in each Availability and assure that the state of the services stays syncronized.
The second task is to assure that the backup services becomes available to end consumers in the case of a failure of the primary service.
One way to solve this problem is to reassign a given IP adress to the standby server. AWS currently offers two ways to accomplish this failover. The IP Failover scenarios are described here.
This document focuses on a name based failover in a private VPC with access to an on premises intranet.
Targeted architecures for Route53 Failover
This document describes how to switch the IP address for a given name entry in the AWS specific Domain Naming service Route53. This approach will work for the following architectures:
- Consumers of a highly available service connect through the services through name exclusively.
- Consumers of such a service have a comain name service configured which uses the AWS Route52 information
- They use a public AWS IP address with a publicly registered domain
- They have an on premises intranet which uses AWS Route53 as a secondary domain name server.
- End consumers are able to reconnect a network session in a case of failure
The solution presented on the following pages will resonate more with DNS users. A similar solution using Active Directory and the Actice Directory Connector is being presented here.
- 6259 views
Creation of a Route53 Service in a private VPC
Creation of a Route53 Service in a private VPCEnable your VPC to work with Route53. Skip this step if you already use Route53.
The AWS Command Line Interface (CLI) allows to list all VPCs with the following command:
aws ec2 describe-vpcs
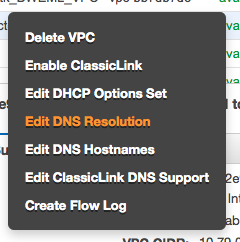 . . |
The following commands will make the instances in your VPC use the domain name entries from Route53. This is most likely required since some of the consumers may be part of the VPC. Use the AWS console. Move to the VPC screen. Make a right mouse click above the VPC which you plan to enable. Select "Edit DNS Resolution" |
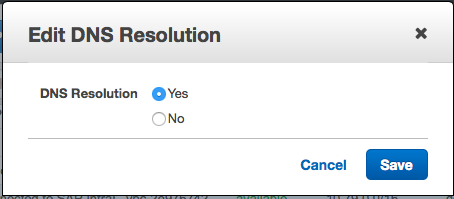 |
It will then show a modal dialog in which you will have to click on "Yes" and "Save" |
The AWS Command Line Interface (CLI) allows to perform this operation though the following command:
aws ec2 modify-vpc-attribute --vpc-id <value> --enable-dns-support
 |
The next step happens as well through the AWS VPC console. Hover the mouse above your VPC. Make a mouse right click. Select "" |
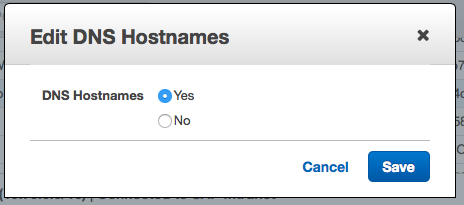 |
It will show a modal dialog. Select "Yes" and Save your data entry. |
The AWS CLI allows to perform this operation though the following command:
aws ec2 modify-vpc-attribute --vpc-id <value> --enable-dns-hostnames
Important: Note down the name of your VPC or tag it. The name will be needed later on.
Creation of the Route53 Hosted Zone (The Domain Name Server)
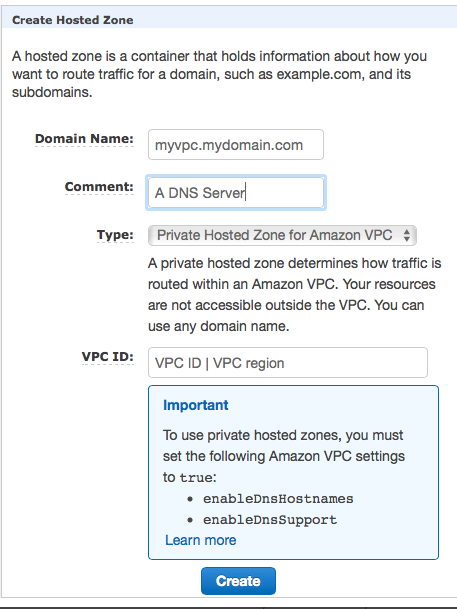
Use the AWS console. Move to the Route53 screen. Click on the Create Hosted Zone button. You will see a dialog like the following one:
|
|
We assume that you will want to use this domain name server for intranet case only. Fill the fields with the following values:
Save everything through using the Create button. |
- 2746 views
Changing the IP Address for a Host Name Entry in Route53
Changing the IP Address for a Host Name Entry in Route53The failover can be execute by changing the IP address for a given host name. This means a A record has to be introducted or modified.
This can be done through a CLI command. The information required is:
- Route53 hosted zone id: for example HOSTED-ZONE-ID
- name of entry: for example myservice
- IP address for entry: for example 10.79.252.13
- domain name: for example myvpc.mycompany.com
- Time to life (TTL): for example 10s
Prework
Find your hosted zone through using the AWS console or the AWS CLI command:
aws route53 list-hosted-zones
Create a file like change-resource-record-sets.json:
{
    "Comment": "Update record to reflect new IP address for a system ",
    "Changes": [
        {
            "Action": "UPSERT",
            "ResourceRecordSet": {
                "Name": "myservice.myvpc.mycompany.com",
                "Type": "A",
                "TTL": 10,
                "ResourceRecords": [
                    {
                        "Value": "10.79.252.13"
                    }
                ]
            }
        }
    ]
}
Replace the string myservice.myvpc.mycompany.com with the host name and the domain which matches your requirements.
Replace 10.79.252.13 with the IP address where your service is being provided.
Changing the A record in Route53
Use the following AWS CLI command to implement the change:
aws route53 change-resource-record-sets --hosted-zone-id HOSTED-ZONE-ID --change-batch file:///mypath/change-resource-record-sets.json
Replace HOSTED-ZONE-ID with the identifier for your hosted zone. Pick the correct path to your json configuration file.
This command can be used to create an A record initially. It will work as well if the record already exists. It will then update the IP address and the TTL value.
The command will return a transaction Id which should be caught...
Checking Progess of the Update
The Route53 update takes as while (~20s). The successfull completion of the transaction can be checked with the following command:
aws route53 get-change --id <value>
The result will provide a status field which is PENDING or INSYNC.
- 8787 views
Propagating the Name Change back to the On-Premises Intranet
Propagating the Name Change back to the On-Premises IntranetWe assume here that an on-premises intranet user wants to use a service in the AWS cloud. The service has been made highly available by two services. A high availability service will point to the active and available service by changing the IP address in the Route53 naming service.
| AWS now provides the service Route 53 Resolvers for Hybrid Clouds which solves this problem. |
This page explains what needs to be done to allow on-premises service consumers to get an IP address from am Route53 service. Customers who implemented Microsoft Active Directory will have to follow this blog post. The remainder of this page will deal with DNS implementations.
The problem is, that Route53 is serving only EC2 instances in a VPC. It not exposing it's service back over the VPN tunnel to the intranet.
The solution for this problem are DNS forwarders called "bind forwarders". This page explains how to create such a bind forwarder. Users will actually want to create two bind forwarders in two different availability zones to avoid a single point of failure.
The final architecture will look as follows:
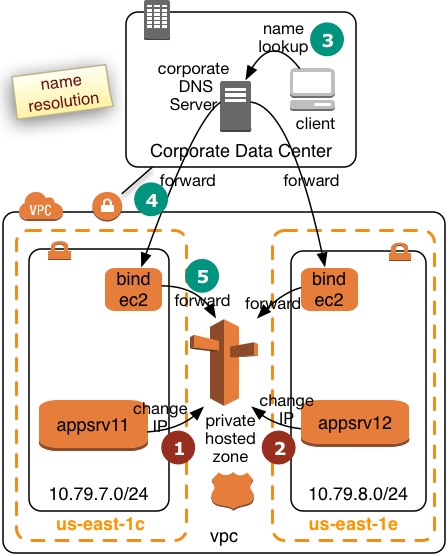 |
We will create two bind forwarders in two AWS Availabilty Zones. Corporate clients will submit their queries to the corporate DNS server. The corporate DNS server will then relay the requests to the bind forwarders. The bind forwarders will query Route53 for the final resolution. We assume the the VPC will operate in a separate subdomain of the intranet. This will simply the routing for the corporate DNS server. The diagram to the left shows how two application servers register or deregister themselves in Route53 win step 1 and 2. Step 3 to 5 shows how the name resolution request will be pulled from Route53. This page describes how a bind forwarder can be configured. We assume that the we have the following network topology:
|
Creation of EC2 Instances
Create two EC instances. The T2 instance type is likely to be sufficient:
- Pick the two IP addresses from above. It'll be important that the subnets are located in different Availability Zones
- Pick Amazon Linux
- Use Security Groups with the following inbound settings
- ssh, tcp, port 22 open to 10.0.0.0/8
- DNS(UDP), port 53 open to 10.0.0.0/8
- DNS(TCP), port 53 open to 10.0.0.0/8
- Use a certificate
- Disk requirements minimal
Configuration of the named Service
The named service is providing the task we need.
Login a ec2-user to the instance and execute the following commands:
sudo yum install bind
Install the packages required for the named services.
Create the file /etc/named.conf. You may use the vi editor:
sudo vi /etc/named.conf
replace the content of this file with this content:
acl goodclients {
   10.0.0.0/8;
   localhost;
   localnets;
};

options {
   directory "/var/named";
   version "not currently available";
   allow-query { goodclients; };
   forwarders {10.79.0.2;};
   forward only;
};

logging{
   channel simple_log {
   file "/var/log/named/bind.log" versions 3 size 5m;
   severity warning;
   print-time yes;
   print-severity yes;
   print-category yes;
   };
   category default{
      simple_log;
   };
   category client{
      simple_log;
   };
};

zone "us-east-1.compute.internal" IN {
   type forward;
   forwarders {10.79.0.2;};
};

zone "awslab.mycompany.corp." IN {
   type forward;
   forwarders {10.79.0.2;};
};
Change all network specific values (bold) with the ones which match your configuration.
Create a log File for named Service
sudo mkdir /var/log/named
sudo touch /var/log/named/bind.log
sudo chmod ug+w bind.log
Start the Service
Execute the command:
sudo service named start
Make the service permanent and have it started after a reboot:
sudo chkconfig named on
Perform this setup for both of your EC2 instances.
- 3243 views
Use the Name Services in the Intranet
Use the Name Services in the IntranetThe final step is to make your name services in the intranet use the bind forwarders.
The intranet DNS servers will have to forward requests for the awslab subdomain to the two bind forwarders.
Individual clients may add the IP addresses of the bind forwarders to their /etc/resolv.conf file.
- 1952 views