Machine Monitoring
Machine MonitoringDisclaimer: This page and this website are not owned or controlled by Amazon or AWS!
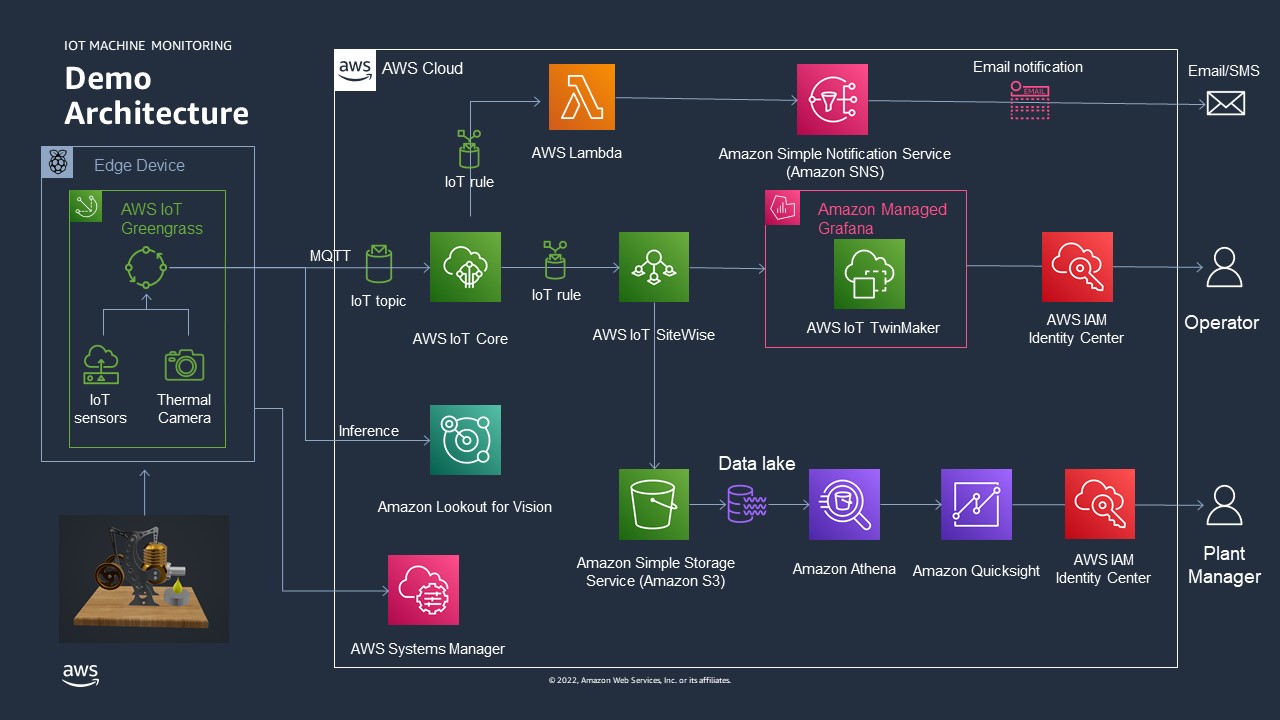
Architecture
See as well: The AWS Manufacturing Reference Architecture
Other resources
- Check out the German language blog about this demonstration!
- 932 views
AWS services used in this demonstration
AWS services used in this demonstration- AWS IoT Greengrass V2: Management of the edge software
- AWS IoT Core: The AWS services to manage the IoT messages
- AWS IoT Sitewise: Collect, organize, and analyze data from industrial equipment at scale
- Amazon SNS: Fully managed Pub/Sub service for A2A and A2P messaging
- AWS Lambda: Run code without thinking about servers or clusters (used to generate a custom SMS and email text)
- Amazon Managed Grafana: Scalable and secure data visualization for your operational metrics, logs, and traces
- AWS IoT TwinMaker: Optimize operations by easily creating digital twins of real-world systems
- Amazon Lookout for Vision: Spot product defects using computer vision to automate quality inspection
- AWS Systems Manager: Gain operational insights into AWS and on-premises resources (used to managed the Raspberry)
- Amazon QuickSight A serverless BI service
- AWS IAM Identity Center (Successor to AWS Single Sign-On): Centrally manage workforce access to multiple AWS accounts and applications
- 113 views
About us
About us- Martin Drewes (mdrewes@amazon.de)
- Christophe Renard (chrenard@amazon.es)
- Dario Rivera (darior@amazon.com)
- Stefan Schneider (stsch@amazon.de)
We are Partner Solution architects working for AWS.
We work with AWS partners.
This demonstration will be shown at the Re:Invent Builders fair 2022 in Las Vegas. All implementations follow the AWS Manufacturing Reference Architecture. Every service published on this page is however not officially endorsed by AWS. Please contact us, if you plan to go into production with certain components, we work with hardware partners, system integrators and consulting partners which are happy to turn this demonstration into a professional solution.
- 131 views
Building this Demonstration
Building this DemonstrationWIP: Work in progress: I'm rebuilding the demo setup. I'm documenting while I'm rebuilding. Revisit this page by the end of March 2023 for a complete document
- 156 views
BOM: Bill of Material (Hardware)
BOM: Bill of Material (Hardware)WIP: Work in progress: I'm rebuilding the demo setup. I'm documenting while I'm rebuilding. Revisit this page by the end of March 2023 for a complete document
All measurements in metric units!
| Id | Number | Item | Comment |
|---|---|---|---|
| 1 | 4 | Plywood 250x350mm (Bottom, Middle board, Upper board, cover of case, 6mm thick | beech is very robust. The upper board has to carry quite some load |
| 2 | 1 | Plywood 70x40mm,6mm thick, raiser for the burners | Use the leftover from the cut out of the middle board |
| 3 | 8 | wood screws, 3mm x 15mm | to fasten the three boards |
| 4 | 2 | Plywood 238mmx110mmx6mm | the sides of the cover box |
| 5 | 2 | Plywood 350mmx110mmx6mm | the other sides of the cover box |
| 6 | 1 | HB12: Big Powerstation | the Stirling engine. Pick self assembly. The two cylinder model is more robust against wind from the side. The flame may not generate enough heat for the HB10 or HB11 in windy trade show halls. |
| 7 | 1 | Raspberry 4 Model B 8GB starte kit | The |
| 8 | 1 | Case for DIN rail mount | GeekPi sells an enclosure for rail mounting |
| 9 | 1 | Rail for case (DIN TS35) | The rail will need to be shortened |
| 10 | 1 | TRCT500 IR sensor | Pack of 3. |
| 11 | 7 | Round head M4 screws 10 or 12mm |
|
| 12 | 5 | M4 screw nuts |
|
| 13 | 1 | Kit of jumper cables | Female-Female ones are required. Lengths required vary in between 10cm and 30cm |
| 14 | 1 | kit, flat band cables | to reach the physical location of the Raspberry optical camera |
| 15 | 1 | Raspberry Camera Module 3 Wide | wide angle is important here. The autofocus is very helpful. An earlier camera will work as well. They have however a fixed focus which needs to be broken to just for the focus at ~12cm |
| 16 | 1 | MLX90640 | Infrared camera, 55 degrees, with sockets to plugs. Soldering required for models without a plug... |
| 17 | 1 | plug fo MLX90640 | This plug allows to connect the infrared camera to regular breadboard cables |
Disclaimer: This list looks very concise. This is the third revision of the demonstration. The components are known to work. Most components can be replaced by different ones. There are lots of degrees of freedom...
- 105 views
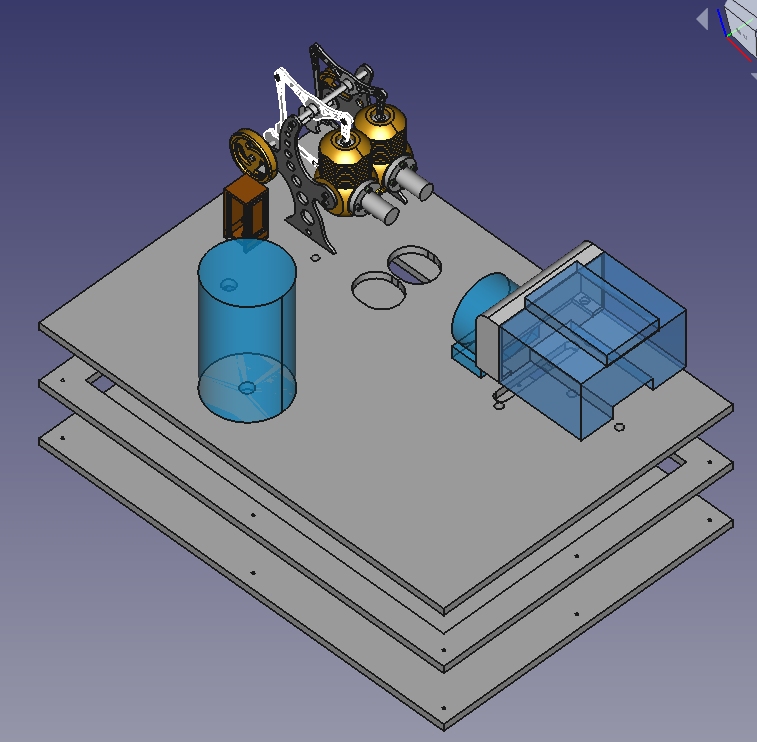
Mechanical Design and Layout
Mechanical Design and LayoutThe mechanical layout follows a number of requirements:
- robustness: The demonstration will be taken to customers and trade shows. It needs to be robust
- It has to fit into hand luaggage
- No part should be damaged
- Cable connection have to be robust and protected against accidental damage
- It has to look a kind of professional, viewers shouldn't be distracted by non relevant parts
- has to meet the skills of the builder
- basic wood processing
- soldering
- 3D printing
- plastic processing (grinding, drilling, cutting)
The layout looks as follows:
- 122 views
IR Sensor TCRT5000 (RPM Counting)
IR Sensor TCRT5000 (RPM Counting)WIP: Work in progress: I'm rebuilding the demo setup. I'm documenting while I'm rebuilding. Revisit this page by the end of March 2023 for a complete document
Wiring plan.
Sensor seen from the back. Electrical pins at the downside. Pins from left to right. The cable colors are arbitrary, pick them as you like. 30cm long female-female cables work out well. The cables get connected directly with the Raspberry pins, no resistors are required.
| Pin | Meaning | Color | Comment |
|---|---|---|---|
| 1 | A0 | Not being used | |
| 2 | D0 | Red | |
| 3 | GND | Brown | |
| 4 | VCC | Orange |
Placing and Tuning
The sensor has to be placed at about 5mm distance from the flywheel. The flywheel needs a black mark to make the IR sensor to trigger an event.
The TCRT5000 has a potentiometer at the rear side. It allows to calibrate the sensitivity. Turning this potentiometer up to a half turn to the left or right should trigger the events. The TCRT5000 sensor has a LED at the rear side. This sensor will blick with every event when if it is adjusted correctly.
- 62 views
Infrared Camera (MLX90640)
Infrared Camera (MLX90640)We use an infrared camera of the type MLX90460 with a 50mm lens for three purposes:
- temperature cool cylinder
- temperature warm cylinder
- the flame burning
It'll take four components to build this sensor
A Housing for the Sensor (the Rocket)
The camera has to be placed 7 to 10 cm from the flame.
The camera has to have a fixed position in relation to the Stirling engine. The software will have to pick two rectangles out of the image. This is a static software configuration.
The Sensor
The MX90460 with a 50 mm lens It has a 32x24 pixel array. I got it from here.
The connector 3.0V does not get used. The camera gets powered with the VON cable.
Connector to the Camera and extension Cable
The wires to the camera can be directly soldered on. I decided to buy a small plug (4 Pin Dupont female). This cable is 150mm long. This is not long enough to connect it to the Raspberry. I had to put a 300mm long male-female 4 wire extension cable in between. This allows me to change the camera without having to solder. I have to switch colors in the wiring plan to connect to the Raspberry.
The information flow starts from 4 contacts from the camera. I pick it up with with 4Pin Dupont plug. I extend it with a male-female cable. This cable gets connected with the GPIO pins of the Raspberry.
The Wiring Schema
| MLX90460 | Connector Cable Color (arbitrary) | Cable Color (arbitrary) | Raspberry Pin | GPIO |
|---|---|---|---|---|
| VIN | Green | Green | 1 | 3.3V |
| SDA | Purple | Purple | 3 | GPIO 2 |
| SCL | Blue | Blue | 5 | GPIO 3 |
| GND | Yellow | Yellow | 14 | GND |
| 3.0V | - | - | - | - |
Enable the Operating System
The sensor is using the I2C protocol. It needs to be enabled. Use the interactive "Raspberry Pi Configuration" tool and enable it in the "Interfaces" section. Reboot the Raspberry.
An alternative is to update /boot/config.txt with the following two parameters
dtparam=i2c_arm=on
dtparam=i2c_arm_baudrate=1000000
The first parameter will do the same as the interactive tool. The second parameter is a safety precaution to avoid bottlenecks on the bus.
Testing the Sensor
The took i2cdetect needs to be installed upfront:
pi@raspberrypi:~ $ sudo apt-get install -y python3-smbus
pi@raspberrypi:~ $ sudo apt-get install -y i2c-tools
Then use the command
pi@raspberrypi:~ $i2cdetect -y 1
It should list a table. The table has to have an entry "33" somewhere. The is the identifier of an MLX90640 sensor on the bus.
Enabling Greengrass V2 to access the Sensor
The Python scripts run as user ggc_user in Greengrass. Use the following command to allow ggc_user to access i2c:
sudo usermod -a -G i2c ggc_user
Enabling the Calibration of the Camera
The camera will be in different positions depending on the physical setup. The Greengrass component will install a a calibration program as well. This calibration will have to be run as root. The calibration program is written in Python3 and it will need a number of Python libraries. Install them with the command:
At this point, the MLX90640 is ready to be read by the Raspberry Pi. However, since the Adafruit library is being used, a few other libraries need to be installed:
pi@raspberrypi:~ $ sudo pip3 install RPI.GPIO adafruit-blinka
pi@raspberrypi:~ $ sudo pip3 install adafruit-circuitpython-mlx90640
pi@raspberrypi:~ $ sudo pip3 install matplotlib
- 109 views
Optical Camera (Module 3)
Optical Camera (Module 3)WIP...
Cabling is straight forward. The module 3 camera gets connected with a flatland cable. Pass through holes have to be significant larger.
It'll take one change to allow the Greengrass component to access the hardware component.
Execute the following command:
$ sudo usermod -a -G video ggc_user
- 26 views
The Base Board
The Base BoardWIP: Work in progress: I'm rebuilding the demo setup. I'm documenting while I'm rebuilding. Revisit this page by the end of March 2023 for a complete document
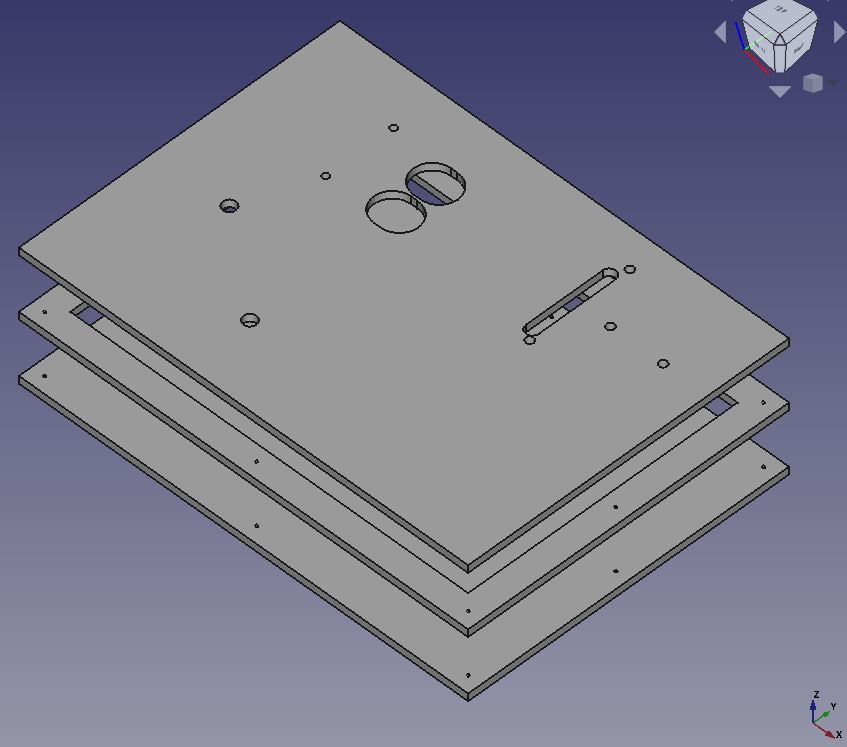
Use four boards 350mm x 250mm x 6 mm beech plywood boards. The material is very sturdy, it won't bend quickly.
- The lower board is the simplest one. It only needs 8 holes for srews to get tied with the two upper boards
- The middle board has a large cut out which is 20mm smaller than it's size. This empty space will hide all the cables
- Keep a small board at the middle level. The two burners shouldn't sit lower than 6 mm. Make it large enough to fit underneath the two holes for the burner. You can glue it to be in the right position. You can leave it at the right place. The upper and the lower board will keep it in place through friction.
- The upper board is the most complex one. It'll have the holes to fix all the objects and it'll need holes for the cables to go through.
- All components will leave 20mm distance from any boarder. The cover will sit on the upper board. The cover will consist of 10mm walls.
- The cover:
- I used birch plywood boards with the sizes
- 2 boards 350mm x 110mm x 10mm
- 2 boards 330mm x 110mm x 10mm
- The 10mm birch plywood panels allow to use 6mm wooden dowels to connect all 4 boards
- The top cover is the 4th beech plywood board. I nailed it the the side boards
- The cover board isn't shown at the image below
- I used birch plywood boards with the sizes
WIP: The position of the holes will get published at a later point of time. More and more holes are required for the objects which will be documented in future.
- 25 views
The Raspberry
The RaspberryWIP: Work in progress: I'm rebuilding the demo setup. I'm documenting while I'm rebuilding. Revisit this page by the end of March 2023 for a complete document
- 40 views
Raspberry IO Wiring
Raspberry IO WiringWIP: Work in progress: I'm rebuilding the demo setup. I'm documenting it, while I'm rebuilding. Revisit this page by the end of March 2023 for a complete document
The cable colors are arbitrary. Pick which ever color you want to pick!
| Pin | GPIO Id | Cable Color | Connected device | Comment |
|---|---|---|---|---|
| 1 | 3.3V | Red 30cm | MLX90460 Power | Power |
| 2 | +5V | Orange 30cm | TCRT5000 Power | Power |
| 3 | SDA | Blue 30cm | MLX90460 | |
| 4 | +5V | Red | Raspberry fan | Raspberry Cooling |
| 5 | SCL | Yellow 30cm | MLX90460 | |
| 6 | GND | Black | Raspberry fan | Raspberry Cooling |
| 7 | 4 | Red 30cm | TCRT5000 | Binary |
| 8 | 24 | |||
| 9 | GND | Brown 30cm | TCRT5000 | Ground |
| 14 | GND | Broen 30cm | MLX90460 | Ground |
- 89 views
Software Configuration
Software ConfigurationWIP: Work in progress: I'm rebuilding the demo setup. I'm documenting while I'm rebuilding. Revisit this page by the end of March 2023 for a complete document
- 76 views
Raspberry Configuration
Raspberry ConfigurationWIP: Work in progress: I'm rebuilding the demo setup. I'm documenting while I'm rebuilding. Revisit this page by the end of March 2023 for a complete document
OS Configuration
Use the default OS from from Raspberrypi.com and configure it on a 32GB SD card. Use a version with the desktop software. The Raspberry may need to connect to a new Wifi. It's simpler to do this on the fly with a monitor and a key board.
I'm using:
pi@raspberrypi:~ $ more /etc/os-release
PRETTY_NAME="Raspbian GNU/Linux 11 (bullseye)"
NAME="Raspbian GNU/Linux"
VERSION_ID="11"
VERSION="11 (bullseye)"
VERSION_CODENAME=bullseye
ID=raspbian
ID_LIKE=debian
HOME_URL="http://www.raspbian.org/"
SUPPORT_URL="http://www.raspbian.org/RaspbianForums"
BUG_REPORT_URL="http://www.raspbian.org/RaspbianBugs"
I created a user pi for backward compatibility reasons.
Upgrade to the latest packages
$ sudo apt update
$ sudo apt dist-upgrade
$ sudo apt clean
$ sudo reboot
Prepare GreenGrass V2 installation
Install GGV2 accoring to this installation page.
Allow Greengrass user to access GPIO
Execute the following command to make the ggc_user to be part of the gpis group:
$ sudo adduser ggc_user gpio
- 62 views
FAQ: Frequently asked Questions
FAQ: Frequently asked QuestionsHow do I implement this architecture?
All AWS services are public available. The demonstration has been build using public available tutorials. Everything in the AWS cloud can be generated by scripts or configured through the AWS console
I am a AWS customer or partner and I'm interested in the demos and the services. How can I adopt them?
Get in touch with us. We will help you depending on your business case.
Is this architecture ready for industrial production use?
Yes and no...
Yes: all AWS services all highly available. They are scalable. Security is at a production level. The Greengrass V2 container manages the software on the Raspberry at a production level.
No: The Raspberry, the sensors and the wiring is not a professional level. We recommend to work with AWS partners who have verified Greengrass V2 hardware and carrier grade sensors. This project had no funding. This was the cheapest solution.
The quality of the Python scripts which run on the Raspberry are not at a quality level to use it at production. There is very limited error checking; there is very limited checking for incorrect data; the software has no life cycle. The gathering and filtering of data at the edge device would be different with professional hardware and professional sensors
Can we get access to the Python scripts running in Greengrass V2?
Not as of today (November 2023). The scripts have been derived vom AWS tutorials and Raspberry websites. The sensor libraries are open source raspberry libraries.
AWS does not release the scripts as of today since they did not yet pass the reviews to allow AWS to publish them as Open Source. Such a review would require significant resources in AWS. Please talk to us, we want to share the scripts with the community...
Where can I get such a Stirling machine?
Search for Stirling machines at amazon.com!
We bought our machines from Böhm. Böhm ships self assembly and assembled Stirling engines world wide. We picked the engines since they are robust enough for heavy usage. The oldest machine which we use has more than 20h of operation. Böhm ships as well spare parts.
... and yes, they are a kind of affordable. Get one as a Christmas present. The eight year old in yourself deservers it.
- 108 views